
The making of Lucy's pendant
Lucy's partner Josh approached me to create a bespoke, one-of-a-kind piece of jewellery for his partner Lucy, for him to give to her for her 30th birthday. For a detailed description of this project please see HERE, as this page will focus on how I made the piece.
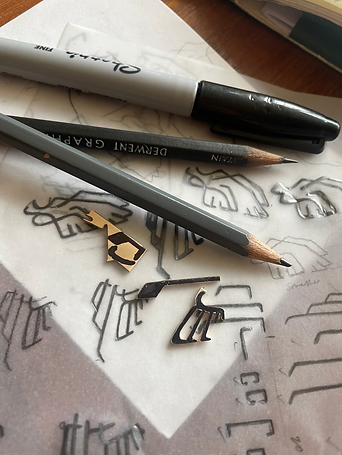
I design everything with paper and pencil, using tracing paper to copy elements I like from one drawing to the next, and changing any parts that aren't working. From this I end up with a final design, and then calculate the minimum size of the piece of metal required to make all elements.

I use tracing paper again, to trace the design directly onto the surface of the metal. These tracings I ink in with sharpie and carefully cut out using a saw.
In between cut-outs I refer back to my initial designs to check I'm not going astray.

Eventually all the individual pieces are ready, and the pendant starts to take shape!


Next, the time-consuming task of individually filing each piece into the smooth, flowing shapes of my design. I hand file every surface of every cut-out, using my judgment to know exactly how much metal to take off, and how to shape each piece. Then I sand every face of each cut-out with sandpaper, to remove any file marks and perfectly smooth the surface ready for polishing. Although this step takes a long time, it's also very satisfying, as each cut-out goes from a roughly sawed piece of uninspiring metal, to a shape that looks like a piece of jewellery in its own right!
To set each stone upon the "wing feathers" of the piece, I handmade each setting. Using an offcut from the initial square piece of gold, I used a rolling mill to create a thin strip of metal. Using an offcut like this is much more economical for a client than buying a new strip of gold for the setting. I used this thin strip of gold to create an outer wall for each stone which perfectly fitted the shape of the stone: not too tight and definitely not loose!


Once I was happy with each setting I soldered them to each of the "feathers". Then I drilled a hole through the back of each setting (not for light, as human bodies don't glow. This hole is so you can push the stone out from behind if you have to!) and used a burr to cut a seat for the stone: essentially you grind away metal so the belly of the stone sits nicely upon the piece of metal underneath.
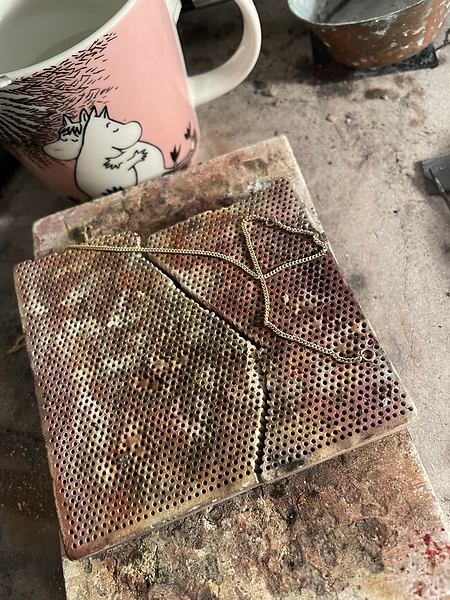
After making the settings it was time to tackle the chain.
I prefer to buy loose chain for clients, and then attach a clasp of my own choosing, as it means you can choose a much better quality clasp (I much prefer lobster clasps to round clasps). I created the connector for the clasp out of another offcut ~ this connector is sometimes ommitted from mass-produced chains, but adding it in means that the clasp will always lie flat against your neck.
As standard practice I also always add an extra large link partway down the chain, so the pendant can be worn either long or short. These little details make such a difference to the wearability and versatility of a piece, and as I want everything I create to be worn and loved as much as possible, adding these kind of details is a no-brainer for me!

With everything assembled and ready, it was finally time to start soldering!
Soldering layered pieces of this kind requires careful planning. Each upper layer needs to be supported until it's soldered in place, so the order in which you attach each layer is vital to get right...and if you misdirect heat and muck up a lower layer, it's a nightmare to extricate the overheated piece: you have to pull every element apart and start all over again.
It requires a cool head and a calm hand, both of which are things I've practiced. I carefully built up each layer until the whole piece was soldered together... and heaved a sigh of relief!


Next I created a bale, again out of an offcut. After much deliberation I decided that a "rabbit ear" bale was best, as a solid bale looked far too chunky for the minimal design. Then I polished every face of the piece, making sure that every single angle was brought to a brilliant shine.


Last but not least, setting the stones! A lot of jewellers send their work away to be set, but I like to do all my own work myself, including setting. I do understand: a lot of jewellers find setting very stressful and prefer to send the work away to an expert. However, that means more cost for the client (in postage alone), and for me, I take a huge amount of satisfaction in having created a piece of jewellery from start to finish.
I used a traditional "pusher" to set the stones, a tool very commonly used in the jewellery industry that does exactly what the name suggests: you use it to both push stones into settings (gently!) and push metal over stones to set them (not so gently but very carefully!). This pusher I made myself, and there's also something very satisfying about using a tool you've physically made yourself.
One stone left to set! I deliberately left the tanzanite until last as tanzanite is a delicate stone that cannot be exposed to heat. If I'd set that stone first, and then something had gone wrong with the setting of the ruby or sapphire, I'd have been pretty stuck as I couldn't re-heat the piece. Rubies and sapphires, by contrast, are tough stones that can take a serious amount of heat. So by setting the stones in this order I covered my back, just in case something went wrong and I had to remove a setting and make a new one.
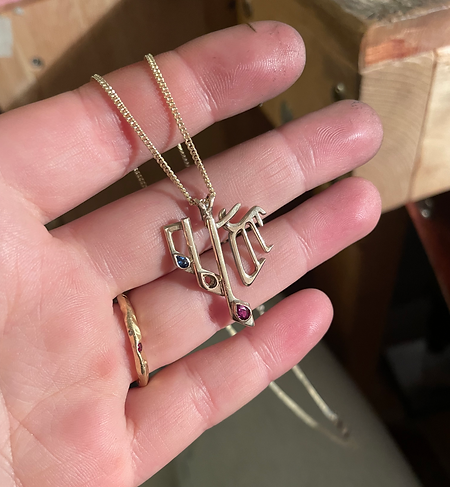

I needn't have worried ~ with the final stone set the piece was finished!
I hope this page has given you an insight into my process: when I say that everything is handmade by me and unique, I mean it. If you have any questions at all, whether youre a client or a jeweller, please just let me know, I'm always happy to talk.
